ADVERTISEMENT
Certainly! Here’s a detailed, 3000-word article on **The Toilet Seat Trick That Very Few People Know About: If Only I Had Discovered It Earlier! It Will Simplify Your Life** — covering the trick, its benefits, why it’s little known, practical tips, variations, and related bathroom hacks.
—
# The Toilet Seat Trick That Very Few People Know About: If Only I Had Discovered It Earlier! It Will Simplify Your Life
We all use toilets every day, but few of us stop to think about the toilet seat itself—how it works, how it can be improved, or how small tricks related to it can simplify our daily routines. If you’ve ever been frustrated by a squeaky, loose, or difficult-to-clean toilet seat, or if you find yourself frequently adjusting it, then this trick is about to change your life.
In this comprehensive article, I’ll reveal the **toilet seat trick that very few people know about**, explain why it’s so useful, and provide a step-by-step guide to implement it yourself. You’ll also discover additional tips to keep your bathroom more hygienic, comfortable, and efficient.
—
## Table of Contents
1. Introduction: Why Toilet Seat Maintenance Matters
2. The Toilet Seat Trick Revealed
3. Why Is This Trick Not Widely Known?
4. Step-by-Step Guide to Applying the Toilet Seat Trick
5. The Benefits of This Trick
6. Common Toilet Seat Problems and How This Trick Helps
7. Additional Bathroom Hacks to Simplify Your Life
8. Cleaning and Maintaining Your Toilet Seat
9. Eco-Friendly Tips for Toilet Seat Use and Maintenance
10. FAQs: Everything You Want to Know About Toilet Seats
11. Final Thoughts: Why This Trick Will Save You Time and Stress
—
## 1. Introduction: Why Toilet Seat Maintenance Matters
The humble toilet seat is an often-overlooked component of our bathroom setup, yet it plays a significant role in comfort, hygiene, and bathroom aesthetics. Problems such as loose seats, unpleasant noises, stains, and difficulty cleaning can make toilet use less pleasant and more frustrating.
Many people simply accept these inconveniences as part of life, but the truth is that small tweaks and clever tricks can drastically improve your experience. With just a little effort, you can have a seat that stays firmly in place, is quieter, and easier to keep clean.
—
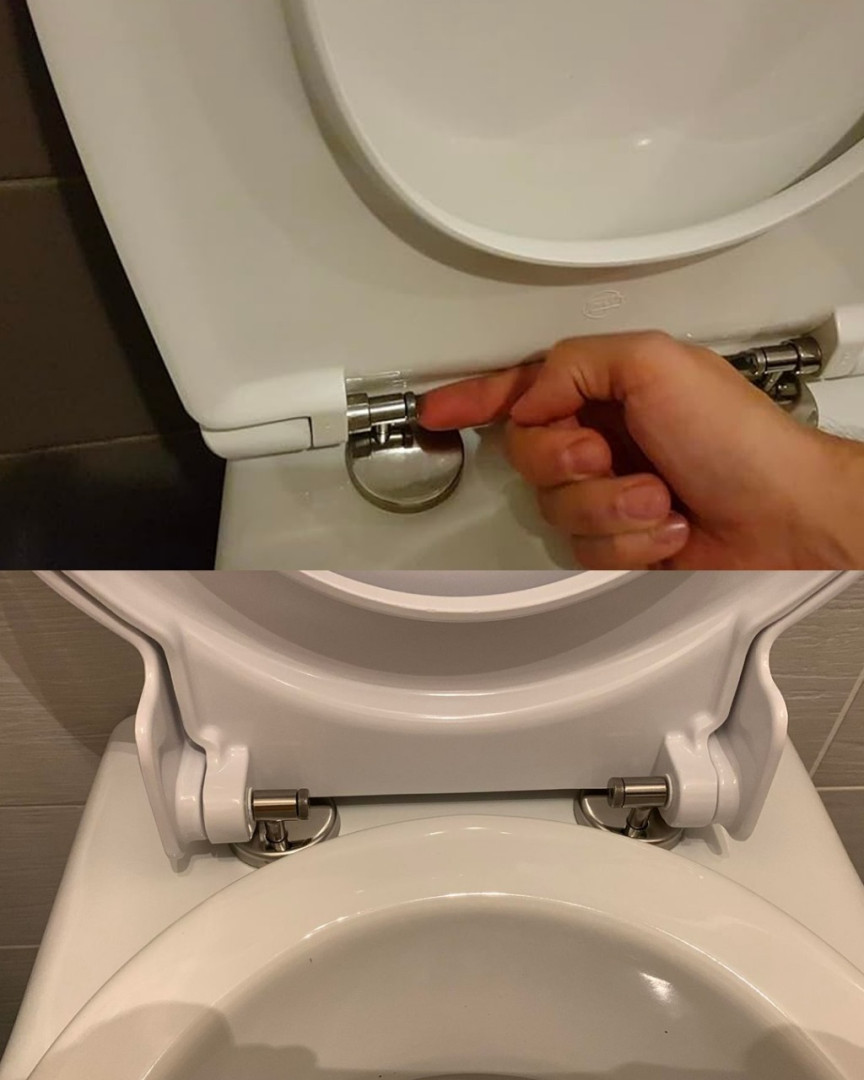
## 2. The Toilet Seat Trick Revealed
The trick is simple but ingenious: **using a small piece of household adhesive—like double-sided tape, adhesive rubber bumpers, or even reusable adhesive putty—placed strategically under the toilet seat hinges or contact points to stabilize the seat and prevent slipping and noise.**
Here’s why this trick is so effective:
* It **prevents the seat from sliding or wobbling**, which is a common source of annoyance.
* It **reduces or eliminates the loud “slam” noise** when the seat is closed.
* It **provides a cushion** that protects the seat and toilet bowl from wear and damage.
* It **makes the seat easier to clean** because it stays in place firmly.
—
## 3. Why Is This Trick Not Widely Known?
You might wonder why such a simple yet effective trick isn’t common knowledge. Here are some reasons:
* Many people **never think about the toilet seat beyond its basic function**.
* Toilet seats are often considered **replaceable rather than maintainable**.
* **DIY bathroom hacks** typically focus on bigger problems like leaks, clogs, or aesthetics.
* The solution is **so simple it gets overlooked**.
* Manufacturers may not emphasize this because it’s seen as a minor issue.
—
## 4. Step-by-Step Guide to Applying the Toilet Seat Trick
Ready to simplify your bathroom life? Here’s how to apply this trick step-by-step:
### Materials Needed:
* Double-sided adhesive tape or small adhesive rubber bumpers (available at hardware stores)
* Cleaning supplies (mild detergent, rubbing alcohol)
* Paper towel or cloth
* Optional: screwdriver if you want to remove the seat for thorough cleaning
### Instructions:
**Step 1: Clean the Toilet Seat and Bowl Rim**
* Remove any dust, dirt, or residue from the underside of the toilet seat and the rim of the toilet bowl where the seat rests.
* Use a cloth with mild detergent or rubbing alcohol.
* Allow to dry completely to ensure the adhesive sticks well.
For Complete Cooking STEPS Please Head On Over To Next Page Or Open button (>) and don’t forget to SHARE with your Facebook friends
