ADVERTISEMENT
**Title:** *Unlocking the Mystery: The Hidden Purpose of the Tiny Hole in Your Nail Clipper*
—
**Introduction**
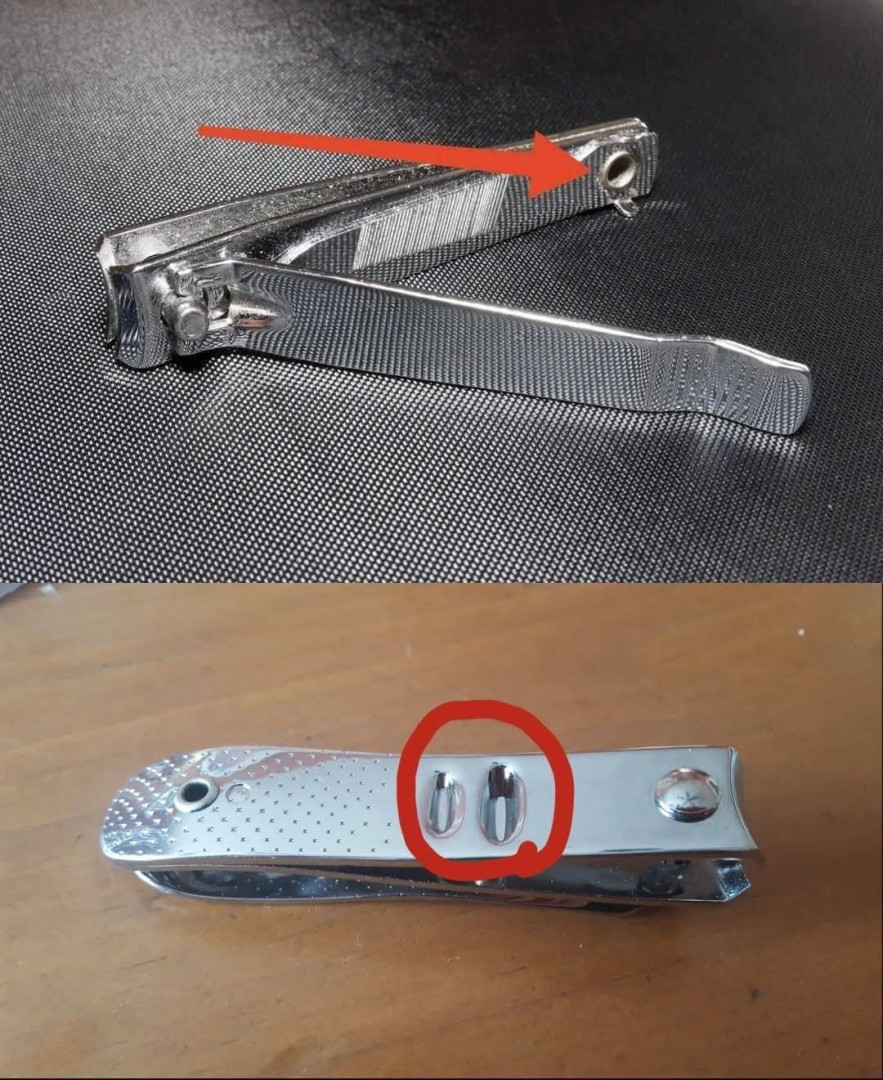
Have you ever noticed the small, round hole at the end of your nail clipper and wondered about its purpose? You’re not alone. Many people overlook this feature, assuming it’s merely a design quirk. However, this tiny hole serves several practical functions that can enhance your grooming routine and even assist in everyday tasks.
In this comprehensive guide, we’ll delve into the various uses of the small hole in nail clippers, providing insights and tips to make the most of this often-overlooked feature.
—
**1. Keychain Attachment: Keeping Your Nail Clipper Handy**
One of the primary purposes of the small hole is to allow you to attach your nail clipper to a keychain, lanyard, or hook. This ensures that your nail clipper is always within reach, preventing it from getting lost in drawers or bags. Whether you’re traveling, at the gym, or simply on the go, having your nail clipper attached to your keys or belt loop can be incredibly convenient.([homemaking.com][1], [positivebrains.in][2])
**How to Attach Your Nail Clipper:**
1. **Obtain a Small Key Ring:** Choose a key ring that is small enough to fit through the hole in your nail clipper.
2. **Thread the Ring Through the Hole:** Open the key ring and carefully thread it through the hole at the end of the clipper.
3. **Attach to Your Keychain or Lanyard:** Once the ring is in place, you can attach it to your keychain, lanyard, or any other item you carry regularly.([homemaking.com][1])
This simple step can save you time and frustration in the future.
—
**2. Enhanced Grip and Control**
The small hole can also serve as an additional grip point, providing better control while trimming your nails. By inserting your thumb or finger into the hole, you can stabilize the clipper, making it easier to apply the necessary pressure for a clean cut. This is particularly helpful for individuals with limited dexterity or strength in their hands.([homeremediesseasy.com][3], [hairspeaks.net][4])
**Using the Hole for Better Grip:**
1. **Insert Your Finger:** Place your thumb or finger through the hole at the end of the clipper.
2. **Position the Clipper:** Hold the clipper as you normally would, using the hole to enhance your grip.
3. **Trim Your Nails:** Proceed with trimming your nails, utilizing the added stability for a more controlled cut.
This technique can improve the precision and safety of your nail trimming routine.
—
**3. Cleaning Under the Nails**
The edges of the small hole can function as a mini tool for cleaning beneath your nails. Its shape allows for gentle scraping without damaging the skin. This is especially useful for removing dirt or debris that may accumulate under the nails.([homeremediesseasy.com][3])
**Using the Hole for Nail Cleaning:**
1. **Position the Edge:** Hold the clipper so that the edge of the hole is facing the underside of your nails.
2. **Gently Scrape:** Carefully use the edge to remove any accumulated dirt or debris.
3. **Clean Thoroughly:** Ensure all areas beneath the nails are cleaned to maintain hygiene.([homeremediesseasy.com][3])
Regular cleaning of your nails can prevent infections and promote overall nail health.
—
**4. Makeshift Screwdriver for Small Screws**
In some cases, the small metal piece near the hole can double as a screwdriver for small screws. While it’s not a replacement for a full-sized screwdriver, it can assist in turning screws when you’re in a pinch.([weverydaystories.com][5], [matheusfeed.com][6])
**Using the Nail Clipper as a Screwdriver:**
1. **Identify the Screw:** Locate the small screw that needs tightening or loosening.
2. **Position the Metal Piece:** Place the small metal piece near the hole into the slot of the screw.
3. **Turn Carefully:** Gently rotate the clipper to turn the screw, applying minimal pressure to avoid damage.([homeremediesseasy.com][7])
This method is suitable for small screws found in items like eyeglasses or electronics.([homeremediesseasy.com][3])
—
**5. Bending Thin Wires**
The small hole can also be used to bend thin wires without straining your fingers. By inserting the wire through the hole, you can apply pressure at the top of the clipper, making the process safer and easier.([matheusfeed.com][6])
**Using the Hole to Bend Wire:**
1. **Insert the Wire:** Place the thin wire through the small hole at the end of the clipper.
2. **Apply Pressure:** Gently press down on the clipper to bend the wire into the desired shape.
3. **Adjust as Needed:** Continue applying pressure until the wire is bent to your satisfaction.
This technique is useful for crafting, jewelry making, or minor repairs.([thebustednews.com][8])
For Complete Cooking STEPS Please Head On Over To Next Page Or Open button (>) and don’t forget to SHARE with your Facebook friends
