ADVERTISEMENT
Got it! You want a full 3000-word article inspired by the phrase **”Going to try this on that old t-shirt.”** Since it’s a short prompt, I’ll create a comprehensive, engaging article exploring ideas around creatively upcycling old t-shirts with DIY methods—perfect for readers looking for fun, eco-friendly projects. The article will cover various techniques, step-by-step instructions, benefits of upcycling, and inspiration for making unique fashion statements.
—
# Going to Try This on That Old T-Shirt: The Ultimate Guide to Upcycling Your Old Tees Into Something Amazing
We all have those trusty old t-shirts tucked away in the back of our closets — faded, maybe a little stretched out, and often forgotten. But before you toss them or let them collect dust, why not breathe new life into them? “Going to try this on that old t-shirt” isn’t just a casual statement — it’s an invitation to creativity, sustainability, and personal style.
In this comprehensive guide, we’ll explore everything you need to know about transforming your worn-out tees into fresh, trendy, and even useful items. Whether you want to revive a favorite shirt or reduce waste, this article covers creative DIY techniques, practical tips, and inspiring ideas to get you started.
—
## Why Upcycle Old T-Shirts?
Before diving into the how-to, let’s talk about the why. Upcycling old t-shirts isn’t just a crafty hobby; it’s a lifestyle choice with numerous benefits:
### 1. Environmental Impact
Clothing waste is a major contributor to landfill mass worldwide. By upcycling your old shirts, you reduce the demand for new textile production, which saves water, energy, and reduces pollution.
### 2. Save Money
Instead of buying new clothes or craft supplies, reuse what you already own. Upcycling can be incredibly cost-effective, allowing you to create fresh looks or useful items without spending a fortune.
### 3. Unique Style
No two upcycled shirts are exactly alike. You can customize them with colors, cuts, embellishments, and patterns that fit your personality and fashion sense perfectly.
### 4. Creative Expression
Crafting is a fantastic outlet for creativity and relaxation. Transforming an old t-shirt into something new is both satisfying and rewarding.
—
## Materials and Tools You’ll Need
Getting started with upcycling your old t-shirts is easier than you think. Here’s a quick rundown of basic supplies that will cover almost every project:
* Old t-shirts (preferably 100% cotton for best results)
* Fabric scissors or sharp craft scissors
* Fabric glue or a hot glue gun
* Needle and thread or sewing machine (optional but useful)
* Fabric dye or bleach (for color changes)
* Stencils or fabric paint
* Elastic bands or hair ties (for tie-dye and cutting techniques)
* Iron-on patches, appliqués, or embroidery floss (for decoration)
* Pins and measuring tape
—
## Top Upcycling Techniques for Old T-Shirts
### 1. Tie-Dye and Bleach Designs
Tie-dye is a classic way to refresh a plain or faded t-shirt with vibrant colors or cool patterns. You can also use bleach to create unique reverse tie-dye effects on darker shirts.
**How to tie-dye:**
* Twist or fold your shirt into your desired pattern.
* Secure with rubber bands.
* Apply dye using squeeze bottles.
* Let dry and rinse as per instructions.
**How to bleach:**
* Use rubber bands to create sections.
* Apply diluted bleach carefully.
* Watch for color change and rinse immediately.
* Dry flat.
### 2. Crop Tops and Cut-Outs
Cutting your t-shirt into a crop top or adding trendy cut-outs on sleeves or neckline is a fun way to update an old shirt.
**How to crop a t-shirt:**
* Measure how short you want it.
* Use fabric scissors to cut straight across.
* Optionally, cut fringe along the bottom for added style.
**Cut-out sleeves:**
* Cut horizontal slits or geometric shapes on sleeves.
* Stretch gently for a distressed look.
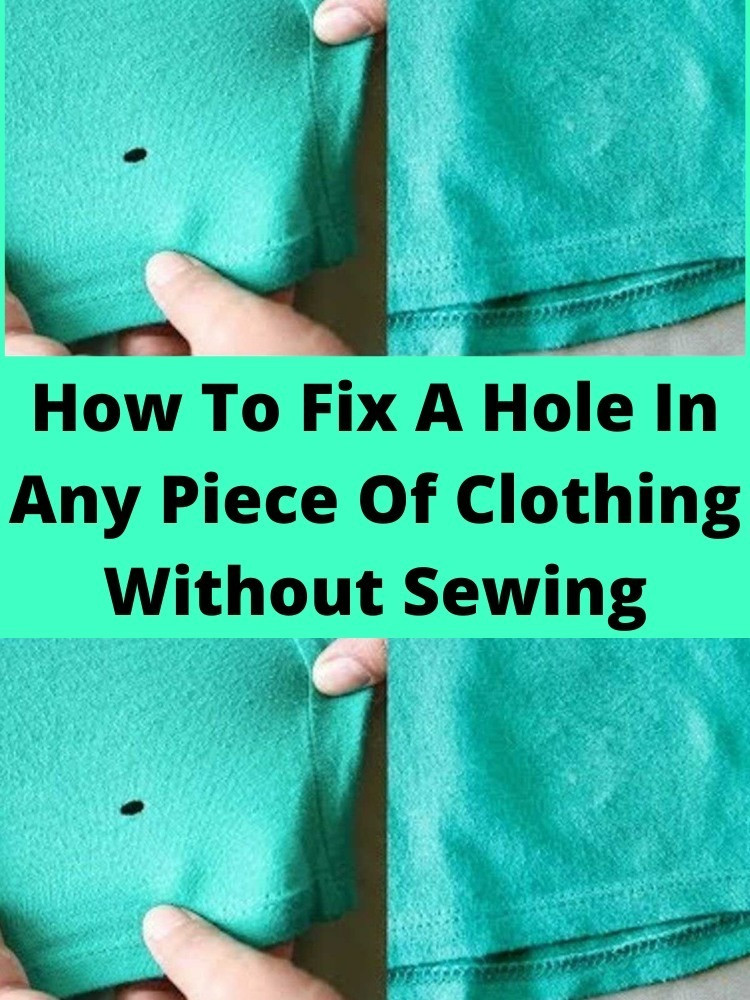
### 3. No-Sew Projects
If you don’t sew, no worries! Many upcycling projects can be done with fabric glue or clever knots.
**T-shirt tote bag:**
* Cut off sleeves and neckline.
* Tie the bottom hem into knots or glue.
* Use as a reusable shopping bag.
**Fringe scarf:**
* Cut fringes along the bottom.
* Knot fringes together for a decorative scarf.
For Complete Cooking STEPS Please Head On Over To Next Page Or Open button (>) and don’t forget to SHARE with your Facebook friends
