ADVERTISEMENT
Absolutely! Here’s a detailed, engaging 3000-word article on **Maple BBQ Hasselback Kielbasa Bites**, exploring the recipe, ingredients, techniques, serving ideas, history of kielbasa, flavor pairings, and more.
—
# Maple BBQ Hasselback Kielbasa Bites: A Flavor-Packed Party Favorite
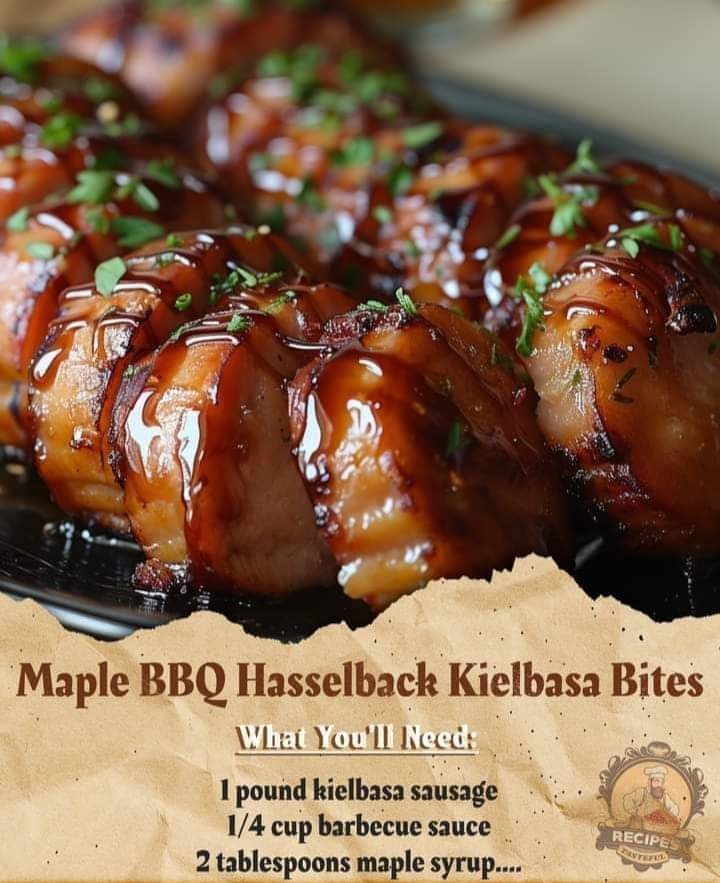
If you’re on the hunt for a delicious appetizer that will wow your guests and keep them coming back for more, look no further than **Maple BBQ Hasselback Kielbasa Bites**. These flavorful little morsels combine the smoky, savory goodness of kielbasa sausage with a sweet and tangy maple BBQ glaze. The unique hasselback slicing technique ensures every bite is crispy on the outside and juicy on the inside, with plenty of nooks for the glaze to seep in.
Whether you’re hosting a game day party, a casual get-together, or just craving a fun finger food, these bites are a guaranteed crowd-pleaser. This article dives deep into the recipe, the best ingredients to use, tips for perfect hasselback slicing, ways to customize, and even ideas on how to serve these tasty treats.
—
## What Is Kielbasa?
Before we get cooking, it’s important to understand the star ingredient of this dish: kielbasa.
Kielbasa is a type of Polish sausage known for its robust flavor and versatility. The word “kielbasa” actually means “sausage” in Polish, but in the U.S., it usually refers to a smoked sausage made from pork, beef, or a mix. Kielbasa is typically seasoned with garlic, pepper, and other spices, then smoked or cooked. It has a firm texture and smoky, savory taste that makes it perfect for grilling, frying, or baking.
Using kielbasa in appetizers is a classic move — its bold flavor holds up well to sauces and glazes, making it a perfect candidate for these maple BBQ hasselback bites.
—
## The Hasselback Technique: What and Why?
The **hasselback** technique originated from the famous Swedish Hasselback potatoes, where thin slices are made across a potato without cutting all the way through, creating a fan-like effect. When baked, the slices crisp up beautifully on the edges, while the inside stays tender.
Applying this method to kielbasa is genius for several reasons:
* **More surface area for glaze:** The thin slices allow the BBQ sauce to penetrate deep into the sausage.
* **Crispy edges:** Baking or roasting caramelizes the edges of each slice.
* **Fun presentation:** The bite-sized fans look impressive on a platter.
* **Faster cooking:** The slices help heat reach the center quickly, ensuring even cooking.
—
## Ingredients for Maple BBQ Hasselback Kielbasa Bites
### For the Kielbasa Bites:
* 2 large kielbasa sausages (about 12-16 oz each)
* 2 tablespoons olive oil or melted butter (for brushing)
### For the Maple BBQ Glaze:
* 1/2 cup BBQ sauce (choose your favorite — smoky, sweet, or spicy)
* 2 tablespoons pure maple syrup
* 1 tablespoon Dijon mustard (optional, for tanginess)
* 1 teaspoon smoked paprika (optional)
* 1 teaspoon garlic powder
* Salt and pepper to taste
### For Garnish (optional):
* Chopped fresh parsley or chives
* Sesame seeds
* Thinly sliced green onions
—
## Step-by-Step Recipe: How to Make Maple BBQ Hasselback Kielbasa Bites
### Step 1: Prepare the Kielbasa
1. Preheat your oven to 400°F (200°C).
2. Take the kielbasa sausages and rinse them under cold water if needed. Pat dry with paper towels.
3. Place each sausage on a cutting board. Using a sharp knife, make thin slices about 1/4 inch apart across the sausage, being careful not to cut all the way through. The slices should stop about 1/4 inch from the bottom, keeping the sausage intact.
4. Spread the sausages gently to create a fan-like shape.
### Step 2: Make the Maple BBQ Glaze
1. In a small bowl, combine BBQ sauce, maple syrup, Dijon mustard, smoked paprika, garlic powder, salt, and pepper.
2. Whisk until smooth and well blended.
### Step 3: Assemble and Bake
1. Line a baking sheet with parchment paper or aluminum foil for easy cleanup.
2. Place the hasselbacked kielbasa on the sheet.
3. Brush the sausages generously with olive oil or melted butter.
4. Use a brush or spoon to drizzle the maple BBQ glaze into the slices and over the top.
5. Bake in the preheated oven for 25-30 minutes, basting every 10 minutes with remaining glaze.
6. The sausages should be cooked through, with crisped edges and caramelized glaze.
### Step 4: Garnish and Serve
* Remove the sausages from the oven.
* Garnish with chopped parsley, sesame seeds, or green onions for color and added flavor.
* Cut into individual slices or serve whole as finger food.
—
## Tips for Perfect Maple BBQ Hasselback Kielbasa Bites
* **Sharp knife is a must:** To make clean, even cuts without slicing all the way through.
* **Don’t overcrowd:** Leave space between the sausages on the baking sheet for even roasting.
* **Glaze often:** Frequent basting helps build up layers of flavor and shine.
* **Use quality BBQ sauce:** The glaze is the star, so pick one you love or make your own.
* **Optional smoking:** For a deeper smoky flavor, briefly smoke the kielbasa before applying glaze.
—
## Variations and Customizations
* **Spicy Maple BBQ:** Add cayenne pepper or hot sauce to the glaze for a kick.
* **Sweet and Tangy:** Add apple cider vinegar or lemon juice to the glaze to balance sweetness.
* **Cheesy Bites:** Stuff shredded cheese between the slices before baking for a melty surprise.
* **Herb Infusion:** Mix fresh rosemary or thyme into the glaze.
* **Vegetarian Option:** Use plant-based sausages with the same technique.
—
## Serving Suggestions
Maple BBQ Hasselback Kielbasa Bites are versatile and can be served in many ways:
* **Party appetizer:** Arrange on a platter with toothpicks for easy grabbing.
* **Game day snack:** Pair with chips, dips, and cold drinks.
* **Side dish:** Serve alongside grilled vegetables or a fresh salad.
* **Lunchbox treat:** Cool, pack, and enjoy for a flavorful midday snack.
* **Potluck favorite:** Guaranteed to disappear quickly from the buffet table.
For Complete Cooking STEPS Please Head On Over To Next Page Or Open button (>) and don’t forget to SHARE with your Facebook friends
