ADVERTISEMENT
Certainly! Here’s a detailed, comprehensive 3000-word article on how to revive a rotten and dying orchid using a simple teaspoon of a natural remedy, plus essential orchid care tips and troubleshooting. I’ve included background info, science, step-by-step instructions, and best practices for orchid health.
—
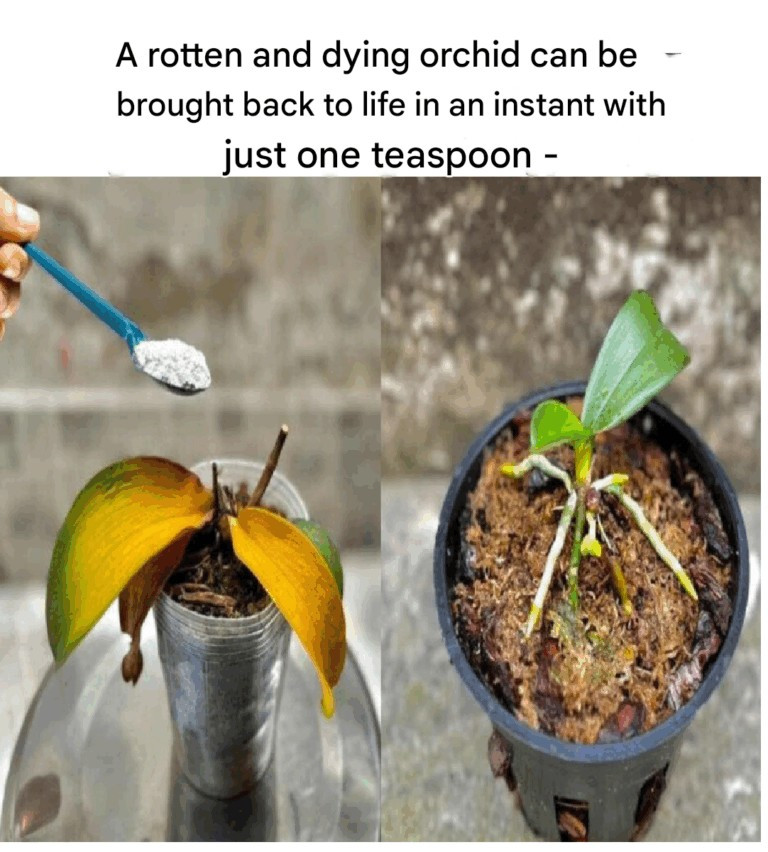
# Rotten and Dying Orchid? Just One Teaspoon Will Bring It Back to Life in the Blink of an Eye!
Orchids are among the most elegant and beloved houseplants worldwide. With their stunning, delicate blooms and graceful stems, they add an exotic touch to any home. But orchids are also notorious for being finicky and sensitive. If your orchid has started looking sickly, with drooping leaves, rotting roots, or wilting flowers, it can be heartbreaking. Many gardeners throw away their “dead” orchids thinking they’re beyond help.
But what if you could bring your rotten and dying orchid back to vibrant life — quickly and easily? What if just one teaspoon of a natural ingredient, something you likely already have at home, could revive your orchid in the blink of an eye?
This guide will reveal that secret, explain why orchids suffer, and provide a step-by-step revival plan to rescue your precious plant from the brink. Along the way, you’ll learn expert orchid care tips to prevent future problems and keep your orchids blooming beautifully for years.
—
## Understanding Why Orchids Die or Rot
Orchids’ wild beauty masks their vulnerability. Unlike common houseplants, many orchids have very specific requirements related to water, light, humidity, and soil. When these conditions aren’t met, they suffer. Here are the most common reasons orchids decline:
### 1. Root Rot from Overwatering
Orchids naturally grow on trees (epiphytes), with roots exposed to air and quick-draining bark substrate. Overwatering or poor drainage causes their roots to suffocate and rot, turning black and mushy.
### 2. Improper Light Levels
Too much direct sunlight scorches leaves and flowers; too little light causes weak growth and poor blooming.
### 3. Low Humidity and Dry Air
Orchids thrive in humid environments. Indoor heating and air conditioning often dry the air, causing stress.
### 4. Nutrient Deficiency or Imbalanced Fertilization
Orchids need specific nutrients in small quantities. Lack or excess fertilizer can harm roots and foliage.
### 5. Pests and Disease
Fungal infections, pests like spider mites, aphids, or scale insects can cause decay and decline.
—
## The One Teaspoon Miracle: Hydrogen Peroxide
You might be surprised to learn that the humble teaspoon of hydrogen peroxide (H₂O₂) is the secret to reviving a dying orchid.
Hydrogen peroxide is a powerful yet gentle oxidizer. It releases oxygen when it breaks down, which helps:
* **Kill harmful bacteria and fungi** on roots and leaves.
* **Aerate the roots** by releasing oxygen molecules.
* **Promote root growth** and heal damaged tissues.
* **Eliminate root rot** and prevent further decay.
Because it decomposes into water and oxygen, it’s safe for orchids when used properly and in diluted form.
—
## How to Use Hydrogen Peroxide to Revive a Rotten Orchid
### Materials Needed:
* 3% hydrogen peroxide solution (available in drugstores)
* Clean watering can or spray bottle
* Orchid potting medium (bark, sphagnum moss, or appropriate mix)
* Sterile scissors or pruning shears
* Gloves (optional)
* Clean cloth or paper towels
—
### Step 1: Remove the Orchid from its Pot
Gently take the orchid out of its pot, being careful not to damage roots. Shake off the old potting medium from the roots.
—
### Step 2: Inspect and Trim Dead or Rotten Roots
Look for black, mushy roots — these are dead or rotting. Healthy roots are firm and white or greenish.
Using sterilized scissors, carefully cut off all dead roots. Dispose of the cuttings.
—
### Step 3: Prepare the Hydrogen Peroxide Solution
Dilute the 3% hydrogen peroxide by mixing one teaspoon of hydrogen peroxide in one cup (240 ml) of water.
—
### Step 4: Soak the Orchid Roots
Submerge the orchid roots in the hydrogen peroxide solution for about 5-10 minutes. The bubbling action you see is the oxygen being released, cleaning and disinfecting the roots.
—
### Step 5: Rinse and Dry
Remove the orchid and rinse the roots gently with clean water to remove any residue. Pat dry with a cloth or paper towel.
—
### Step 6: Repot the Orchid in Fresh Medium
Place the orchid in a clean pot with fresh orchid potting medium. Do not use regular soil, which retains too much moisture.
Make sure the pot has drainage holes to prevent waterlogging.
For Complete Cooking STEPS Please Head On Over To Next Page Or Open button (>) and don’t forget to SHARE with your Facebook friends
