ADVERTISEMENT
Absolutely! Here’s a comprehensive 3000-word article on the fascinating topic:
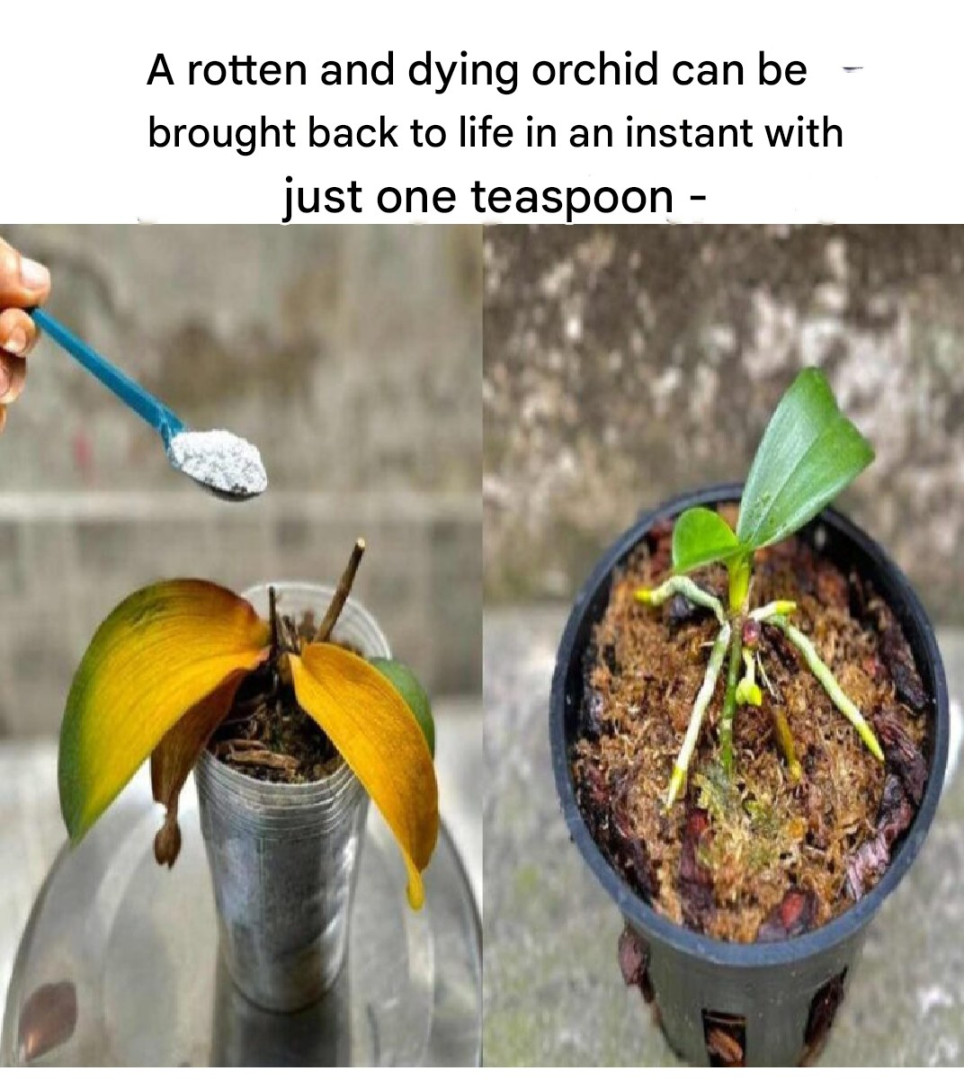
**”Rotten and Dying Orchid — Just One Teaspoon Will Bring It Back to Life in the Blink of an Eye”**
—
# Rotten and Dying Orchid — Just One Teaspoon Will Bring It Back to Life in the Blink of an Eye
Orchids are among the most beautiful and beloved houseplants worldwide. Their exquisite blooms and elegant appearance make them a favorite for home gardeners and floral enthusiasts alike. Yet, despite their charm, orchids are notorious for being finicky and sometimes prone to decline, leaving their owners frustrated and worried.
If you have a rotten and dying orchid, the situation might feel hopeless — wilted leaves, shriveled roots, fading blooms, and maybe even a musty or moldy smell coming from the pot. But what if I told you that all it takes to revive your orchid and bring it back to full health is **just one teaspoon of a special remedy?**
In this article, we will explore how a simple, natural, and inexpensive treatment can restore life to your struggling orchid “in the blink of an eye.” You’ll learn why orchids decline, how this teaspoon-sized miracle works, and the step-by-step method to save your orchid from the brink of death. Additionally, we’ll cover orchid care best practices to keep your plant thriving for years to come.
—
## Understanding the Orchid’s Struggle: Why Do Orchids Rot and Die?
Before diving into the solution, it’s essential to understand why orchids decline in the first place.
### Common Causes of Orchid Decline
1. **Overwatering and Root Rot**
Orchids are epiphytes — they grow on trees in nature, relying on good airflow and fast-draining media. Overwatering or poor drainage causes water to sit around the roots, leading to root rot, which is the most common cause of orchid death.
2. **Underwatering and Dehydration**
Conversely, letting the orchid dry out for too long causes dehydration, shriveled roots, and leaf wilting.
3. **Inadequate Lighting**
Orchids require indirect, bright light. Too little light stunts growth and flowering, while too much direct sunlight can scorch leaves.
4. **Improper Temperature or Humidity**
Orchids thrive in warm, humid conditions. Extreme temperatures or dry air can cause stress.
5. **Pests and Diseases**
Fungal infections, bacterial rot, or pests like mealybugs can attack orchids, causing decay.
6. **Nutrient Deficiency**
Lack of essential nutrients slows growth and bloom development.
—
## The Secret Teaspoon: What Is It and How Does It Work?
The “just one teaspoon” miracle often refers to **hydrogen peroxide (H₂O₂)** — a common household disinfectant with remarkable benefits for plant health.
### Why Hydrogen Peroxide?
Hydrogen peroxide is a powerful oxidizing agent that releases oxygen when it breaks down. This reaction helps in several key ways:
* **Kills harmful bacteria and fungi:** It disinfects roots and growing media by eliminating pathogens causing rot and disease.
* **Increases oxygen availability:** The extra oxygen supports root respiration, encouraging root growth and repair.
* **Breaks down dead organic matter:** Helps clear decaying root tissue to make way for healthy new roots.
* **Stimulates plant growth:** The mild oxidative stress can trigger the plant’s natural defense and regeneration mechanisms.
Because of these properties, a diluted solution of hydrogen peroxide is a go-to remedy among orchid enthusiasts for reviving rotten and dying orchids.
—
## Step-by-Step Guide: Reviving Your Rotten and Dying Orchid with One Teaspoon of Hydrogen Peroxide
### What You’ll Need:
* 3% hydrogen peroxide (available at pharmacies)
* Clean water
* A clean spray bottle or watering can
* Pruning shears or scissors (sterilized)
* New orchid potting medium (optional)
* Orchid fertilizer (optional)
—
### Step 1: Remove the Orchid from Its Pot
Gently take your orchid out of its current pot. If the roots are mushy, brown, or smell rotten, this is a clear sign of root rot.
—
### Step 2: Inspect and Prune the Roots
* Using sterilized pruning shears, cut away all rotten and dead roots. Healthy roots are firm and white or green; unhealthy ones are brown, mushy, and soft.
* Be careful not to damage healthy roots.
—
### Step 3: Prepare Your Hydrogen Peroxide Solution
* Mix **1 teaspoon of 3% hydrogen peroxide** with **1 cup (240 ml) of water**. This dilution is gentle yet effective enough to disinfect roots without harming the plant.
—
### Step 4: Soak and Clean the Roots
* Submerge the orchid roots in the hydrogen peroxide solution for about 5-10 minutes. This will kill harmful microbes and oxygenate the roots.
* If you don’t want to soak, you can spray the solution generously over the roots and crown of the orchid.
—
### Step 5: Rinse and Repot the Orchid
* Rinse the roots gently with clean water to remove excess peroxide.
* Place your orchid in fresh, well-draining orchid potting medium (such as bark mix or sphagnum moss). Avoid regular potting soil which retains too much moisture.
* Use a clean pot with drainage holes to prevent water accumulation.
—
### Step 6: Water Carefully and Monitor
* After repotting, water your orchid lightly with clean water (not the peroxide solution).
* Maintain proper watering habits — orchids generally need watering once a week or when the potting medium feels dry.
* Provide indirect bright light and maintain humidity around 50-70%.
* Fertilize lightly with a balanced orchid fertilizer every 2-4 weeks during the growing season.
—
### Step 7: Observe New Growth
* Within a week or two, you should see signs of revival — new roots emerging, leaves perking up, and even fresh blooms if your orchid was healthy enough before.
* Repeat peroxide treatments every 1-2 weeks if rot symptoms persist.
—
## Why This Method Is Superior to Other Treatments
Many gardeners rely on chemical fungicides or overwatering to “fix” orchids, which can worsen root rot or stress the plant. The hydrogen peroxide method:
* Is **safe and natural**, breaking down into water and oxygen with no chemical residue.
* Targets the root cause — microbial infection and oxygen deprivation.
* Encourages **natural healing** and new root growth.
* Is inexpensive and easy to apply with common household products.
—
## Additional Tips for Orchid Care to Prevent Future Rot
Reviving your orchid is only half the battle. Keeping it healthy long-term requires good care habits:
### Proper Watering
* Water orchids only when the potting medium feels dry to the touch.
* Use room temperature water and avoid letting water sit in the crown of the plant to prevent crown rot.
### Potting Medium
* Use a well-draining, airy medium designed for orchids.
* Repot every 1-2 years to refresh the medium and check root health.
### Lighting
* Provide bright, indirect sunlight. East or west-facing windows are ideal.
* Use sheer curtains if light is too intense.
### Temperature and Humidity
* Maintain 60-80°F (15-27°C) and 50-70% humidity.
* Use humidity trays or room humidifiers if necessary.
### Fertilizing
* Feed your orchid every 2-4 weeks with a diluted orchid fertilizer during active growth periods.
* Reduce feeding during dormancy.
### Air Circulation
* Good airflow prevents fungal growth and encourages healthy roots.
—
## Frequently Asked Questions (FAQs)
### Can I use undiluted hydrogen peroxide on my orchid?
No, undiluted hydrogen peroxide is too strong and can damage roots and leaves. Always dilute as instructed.
—
### How often should I apply the hydrogen peroxide treatment?
Use it once during the revival process and repeat every 1-2 weeks if you notice ongoing rot symptoms.
For Complete Cooking STEPS Please Head On Over To Next Page Or Open button (>) and don’t forget to SHARE with your Facebook friends
